TM 5-4310-393-14
b.
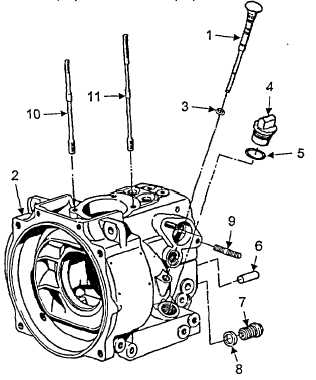
Inspect crankcase for any cracks, discoloration, distortion, rust, corrosion, or other damage. If crankcase is
cracked, distorted, overheated, seriously rusted or corroded on machined surfaces, or exhibits, other serious damage,
replace crankcase
c.
Inspect two studs (Figure 5-52, Item 9), two studs (10), and two studs (11) for thread damage or cracking If
damaged, replace studs
B.
Install.
1.
Installing the Crankcase.
a.
Lubricate gasket (Figure 5-52, Item 8) with
lubricating oil and install on oil drain plug (7) Install oil
drain plug.
b.
Install cylinder pin (6) c. If damaged,
remove two studs (10) and two studs (11) and install new
studs.
d.
If damaged, remove two studs (9) and
install new studs
e.
Lubricate O-ring (5) with lubricating oil and
install on oil filer cap (4). Install oil filler cap.
f.
Lubricate O-ring (3) with lubricating oil and
install on dipstick (1) Install oil dipstick in crankcase
FIGURE 5-52. CRANKCASE
5-7. INSTRUMENTS
GAUGES.
This task covers: A. Calibrate
Tools
Materials/Parts:
Test Stand
Equipment Conditions:
Standard Certified Gauges
A.
Calibrate.
1.
Calibrating the Instruments Gauges.
a.
Using a suitable test stand, compare system gauges against certified gauges of equal service and pressure
range Adjust system gauges as necessary.
5-51