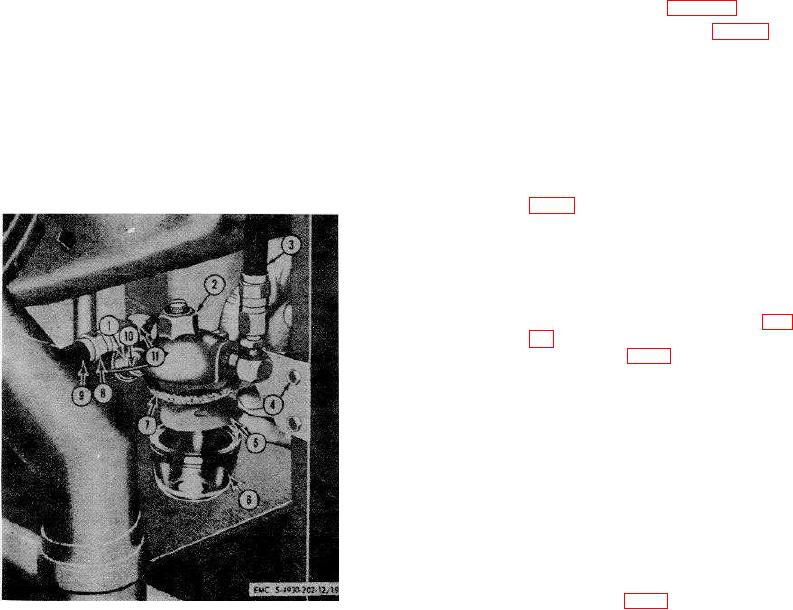
screen (5) from the fuel filter body (2).
(3)
Install the mounting bracket on the
body (2).
c.
Cleaning, Inspection, and Repair.
(4)
Position the fuel filter and bracket
(1)
Thoroughly clean all parts, using an
assembly, on the frame, and secure
approved cleaning solvent.
with the two mounting screws (4).
(2)
Replace the fuel filter gasket.
(5)
Install the fuel tank fuel line (9) and
(3)
Inspect the screen for tears, or
the fuel pump fuel line (3) to the fuel
deterioration, replace if necessary.
filter.
(4)
Inspect the filter bowl for cracks or
(6)
Test the fuel filter for leaks.
chipped glass. Replace if necessary.
110. Carburetor
(5)
Inspect the body for cracks, chips, or
a.
Removal.
defective threads.
Replace if
necessary.
(1)
Remove air cleaner (par. 108).
(6)
Inspect the fuel lines for leaks or
(2)
Disconnect the fuel line (5, fig. 20) at
defective fittings.
Replace if
the carburetor (19).
necessary.
(3)
Disconnect the choke control screw
d.
Reassembly and Installation.
(22), by unscrewing the cap screw,
which secures the linkage to the
(1)
Assemble the screen (5), gasket (7),
choke lever (7).
and bowl (6) to the fuel filter body (2).
(4)
Disconnect the fuel pump primer lever
(2)
Position the thumbnut (1) and clamp
(6) from the top of the carburetor (19).
(10) beneath the bowl (6), and tighten
to secure the bowl to the body.
(5)
Discharge the governor linkage (18,
fig. 7) ball-joint from the slot at the
end of the governor arm (19), by
removing the nut from the top of the
governor arm.
(6)
Disconnect the idle linkage (20) from
the carburetor.
(7)
Remove the two cap screws (15, fig.
20) securing the carburetor (19) to the
manifold (12, fig. 7), and remove the
carburetor and gaskets.
b.
Cleaning, Inspection, and Repair.
(1)
Inspect the carburetor venturi (center
air passage). If a heavy deposit of
carbon is visible in the venturi, clean
the carburetor.
(2)
Replace a defective carburetor.
(3)
Replace
the
carburetor
mounting
gasket.
c.
Installation.
(1)
Install the carburetor gasket on the
manifold (12, fig. 7).
1
Thumbnut
7
Gasket
(2)
Position the carburetor (7) on the
2
Body
8
Fuel line fitting
3
Fuel line to fuel pump
9
Fuel line
manifold and gasket, and secure with
4
Screw
10
Clamp
two cap screws (10). Be sure the
5
Screen
11
Connector fitting
connection is tight and does not leak.
6
Bowl
Figure 19. Servicing and removal of fuel filter.
50

