TM 5-4310-354-14
valve (19). Install drain plug (18), outlet
hose adapter (17), and inlet hose adapter
(16).
(4) Install street elbow (15) in tank (27) at an
angle as close as possible to the same
angle as it was before disassembly (refer
to para 6-2.b.(3) ). Install pipe plug (14) in
street elbow (15). Install two elbows (13).
(5) Screw nipple (12) into tank cover (23).
Attach bracket (11) to separator tank with
two flat washers (10), two lock washers
(9), and two cap screws (8). Assemble
clamp (7) on nipple (12) and attach to
bracket (11) with two flat washers (6) and
two lock nuts (5).
(6) Screw minimum pressure valve assembly
(4) onto nipple (12). Install two close
nipples (3), two air service valves (2), and
two hose couplings (1).
f. Installation.
Install the oil separator assembly
6-3.
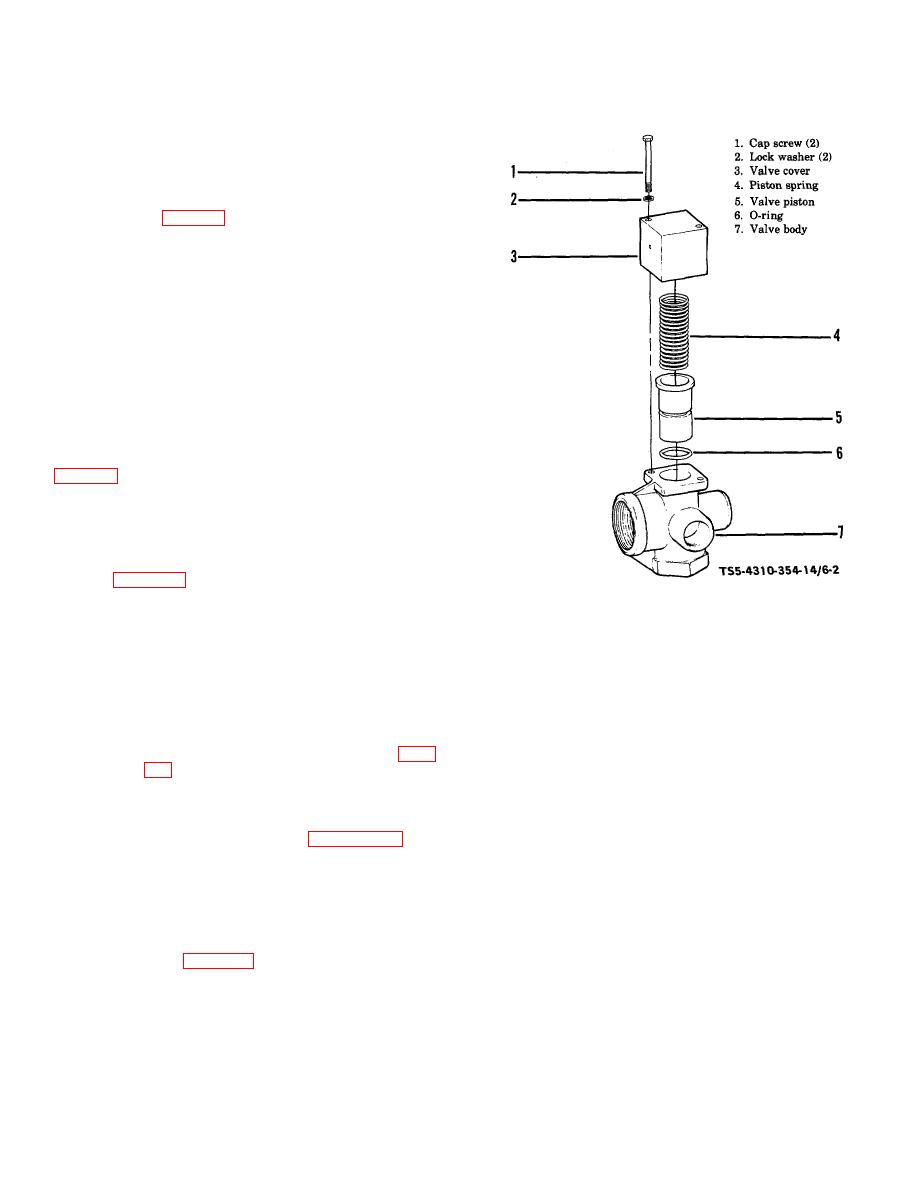
Minimum pressure valve assembly.
a. Disassembly.
Disassemble the minimum
pressure valve assembly in the numerical sequence
TS5-4310-354-14/6-2
shown in figure 6-2 as follows:
Figure 6-2. Minimum pressure valve assembly,
(1) Remove two cap screws (1) and two lock
disassembly and reassembly.
washers (2).
Carefully remove valve
cover (3) and piston spring (4).
(1) Apply a light coating of clean lubricating oil
(2) Remove the valve piston (5) and remove
or petroleum jelly on o-ring (6) to make
o-ring (6) from piston.
assembly easier.
Install o-ring (6) in
groove provided on valve piston (5).
b. Cleaning, Inspection, and Repair.
Assemble valve piston (5) in valve body
(7).
(1) Clean all parts in accordance with para
(2) Assemble piston spring (4), valve cover
5-7.f.
(3), and attach cover to valve body (7)
(2) Inspect all parts for cracks, breaks,
with two lock washers (2) and two cap
distortion, damaged threads, or any other
screws (1).
defect.
(3) Discard o-ring (6, figure 6-2) at
d. Testing.
After reassembly of the minimum
disassembly and replace.
pressure valve assembly, test as follows:
(4) Repair is limited to replacement of
defective parts.
(1) Attach the inlet of the minimum pressure
valve assembly to a controlled air source
c. Reassembly.
Reassemble the minimum
capable of producing a minimum of 100
pressure valve assembly in the reverse numerical
psi air pressure. The air source should
sequence shown in figure 6-2 as follows:
have a pressure gauge between the
control valve and the minimum pressure
valve assembly.
(2) Open the air source control valve slowly
while observing the pressure gauge. The
6-4


