TM 5-4930-218-14
(2) Press in on the defective lamp (5 or 6) and give
with dry cleaning solvent (fed. spec. P-D-680).
it a quarter turn counterclockwise to remove it. In-
(2) Inspect all parts for cracks, corrosion, and
stall a new lamp by pressing it into its socket and
damaged electrical leads. Make sure all electrical ter-
giving it a quarter turn clockwise.
minals are clean and bright. If necessary, buff them
lightly with fine sandpaper. Replace any defective
(3) Replace the door by reversing the removal
procedure.
parts.
d. Reassembly. Reassemble the blackout stop and
(1) Remove lamps (5 and 6) as instructed in sub-
tail light in the reverse order of disassembly. Refer to
paragraph a above.
(2) Remove screws (7 and 9) and lock washer (8)
that secure socket assembly (10) to housing (13);
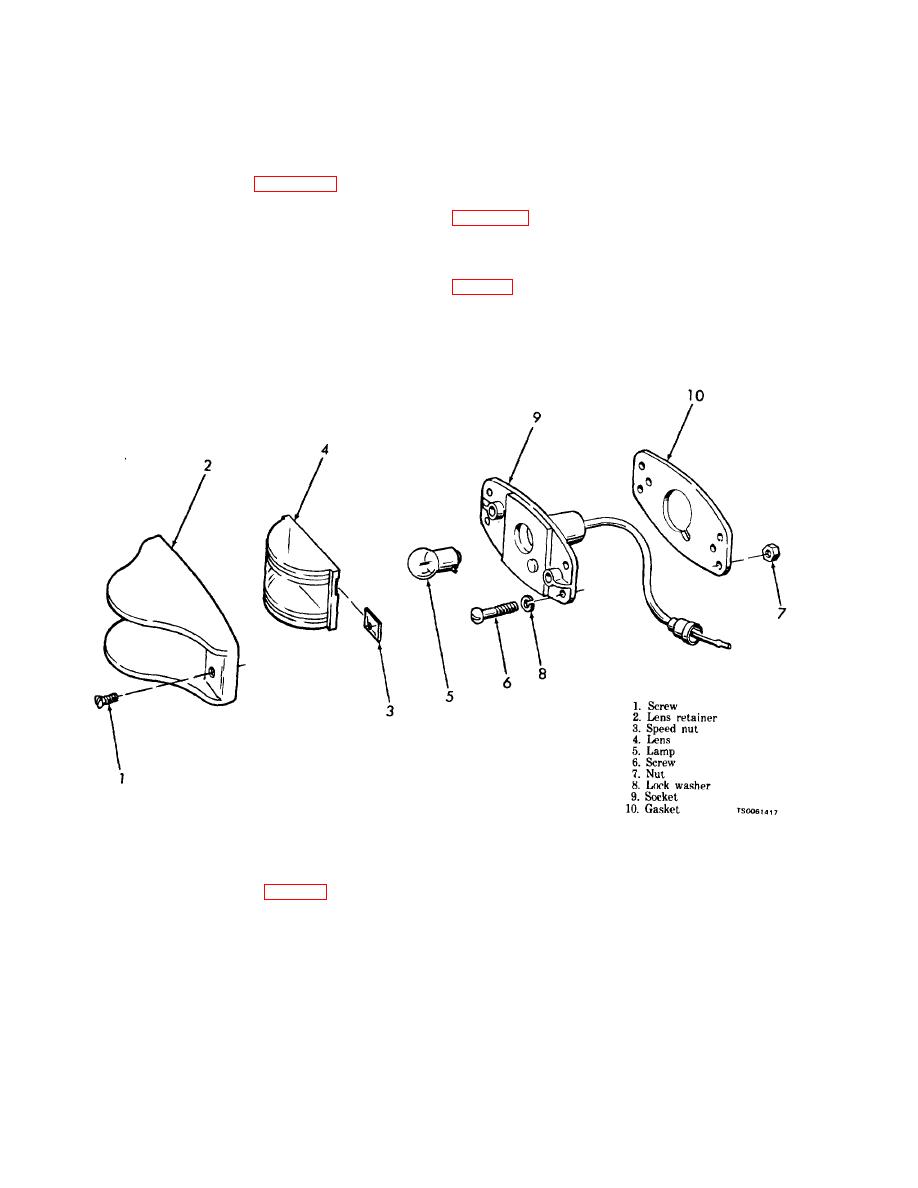
a. Lamp Replacement. Remove the two screws (1,
remove socket assembly.
(3) Remove housing (13) from trailer frame by
and speed nut (3). Press in on the lamp (5) and give it
removing screw (11) and lock washer (12).
a quarter turn counterclockwise to remove it. Replace
it with a new lamp. Reverse the removal procedure to
c. Cleaning and Inspection.
replace the lens.
(1) Wipe all parts with a cloth dampened lightly
with dry cleaning solvent (fed. spec. P-D-680).
b. Disassembly.
(2) Inspect for cracks, corrosion, and damaged
(1) Remove the lamp (5, fig. 4-18) as directed in
electrical leads. Make sure electrical terminals are
subparagraph a above.
clean and bright. If necessary, buff them lightly with
(2) Remove the screws (6), nuts (7) and lock
fine sandpaper. Replace any defective parts.
washers (8) and separate the socket (9) and gasket
d. Reassembly. To reassemble the clearance light,
(10).
reverse the disassembly procedure. Refer to figure 4-
c. Cleaning and Inspection.
(1) Wipe all parts with a cloth dampened lightly
18.


