TM 5-4220-233-14
4-52.
WIRE HARNESS ASSEMBLY.
This task covers:
a.
Removal
b.
Installation
INITIAL SETUP :
Tools
Materials/Parts Appendix D
Socket Wrench Handle, 3/8" Drive
Silicone Sealant (item 14)
Screwdriver, Cross Tip
Leak Detector (item 6)
Screwdriver, Flat Tip
Varnish, Electrical (item 18)
Socket, 7/16"
Wrench, 7/16"
Equipment Conditions
Wrench, 11/32"
None
a. Removal.
WARNING
SHOCK HAZARD. Prior to working on electrical system ensure
intervehicular cable is not connected. Failure to follow this warning may
result in serious Injury.
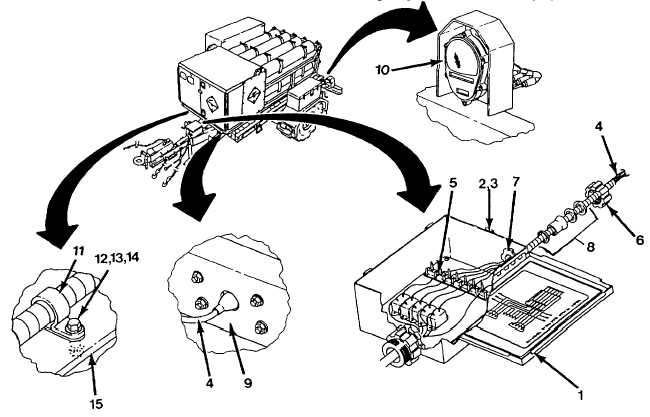
Figure 4-43. Replace Wiring Harness.
(1) Open lid on electrical box (1) by loosening four screws (2) and sliding clips (3) off edge of lid.
(2) Disconnect wire harness (4) from terminal board (5).
(3) Remove stuffing tube cap (6) and pull wire harness (4) out of stuffing tube body (7) and electrical box (1).
(4) Slide stuffing cap (6) and packing assembly (8) off of wire harness and retain for reinstallation.
(5) Disconnect wire harness (4) from eleven marker lights (9) and two composite lights (10).
(6) Remove clamp (11), attaching screw (12), nut (13), and washers (14) from twelve locations where wire
harness is secured to chassis (15).
4-85


