TM 5-4310-451-14
5-39. CAMSHAFT MAINTENANCE (Con’t).
c.
INSPECTION
1.
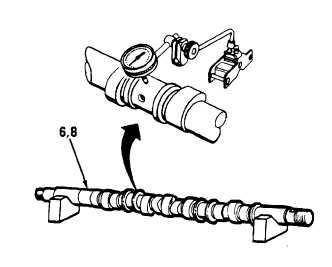
Place camshaft (6 or 8) in V-blocks. Use dial
indicator to check center bearing surface for
runout. Runout must not exceed 0.002 in.
(0.051 mm).
2.
If runout exceeds 0.002 in. (0.051 mm), replace
camshaft (6 or 8).
3.
Measure and note diameters of two bearing Journals (30). Replace camshaft (6 or 8) if diameter Is less than
1.4980 In. (3.8049 cm).
4.
Measure and note diameter of two end bearing Journals (29). Replace camshaft (6 or 8) if diameter is less than
1.4970 in. (3.8024 cm).
5.
Inspect bushings in bearings (18 and 22). If badly worn, replace bearings.
6.
Inside diameter of bushings in bearing (18) must be square within 0.0015 in. (0.0381 mm) of total indicator
reading, and concentric with outside of housing within 0.002 in. (0.051 mm) of total indicator reading.
7.
Bushings in bearing (18) must project 0.045-0.055 in. (1.143-1.397 mm) from each end of bearing.
8.
Bushings in bearing (22) must be flush with ends of bearing bore.
9.
Clearance between end bearing journals (29) and bushings in bearings (18 and 22) is 0.0025-0.006 in.
(0.-.152
mm).
10.
Inspect two bearing sets (28) for excessive wear and scoring. Clearance between bearing journals (30) and
bearing sets must be 0.0025-0.009 in. (0.0635-0.229 mm).
11.
Measure thickness of four thrust washers (26). Replace if less than 0.120 in. (3.048 mm).
12.
Inspect left and right camshaft gears for scoring, pitting, and worn or damaged teeth.
TA705007
5-128


